Safety
Safety is the First Priority
In the event of an emergency, follow these protocols immediately.
Emergency Procedures & Equipment
When to Quench the Magnet
This is a permanent and expensive action.
A "Quench" manually collapses the magnetic field by releasing liquid helium.
-
ONLY quench if: A person is pinned/trapped by a metallic object and is in life-threatening danger.
-
DO NOT quench for: Fires, medical emergencies (heart attack/seizure), or small equipment damange. In these cases, move the participant out of the room first.
🧯MRI-Safe Fire Extinguisher
-
Location: Zone II (Hallway/Changing area)
-
Identification: Look for the non-magnetic (aluminum/composite) canister specifically labeled "MR SAFE." Warning: Never bring a standard red fire extinguisher into Zone IV (the magnet room)
❤️ Automated External Defibrilator (AED)
-
Location: Zone III (Control Room)
-
CRITICAL SAFETY: The AED is NOT MRI SAFE.
-
Protocol: You must move the participant out of the magnet room (Zone IV) and into the Control Room (Zone III) or hallway before applying AED pads or delivering a shock.
️🏃 Emergency Participant Removal
If a participant has a medical emergency inside the scanner:
-
Locate the Manual Release Button on the side of the MRI table/bed.
-
Press and hold the release to disengage the motor.
-
Physically pull the tabletop out of the bore.
-
Immediately wheel the patient of of Zone IV to the designated medical response area.
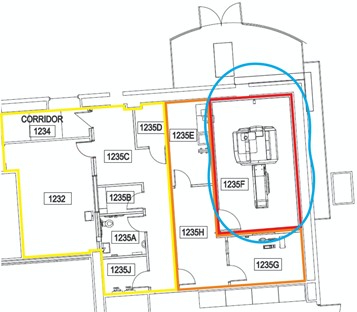
Safety Zones
Zone II
- 1232 - Consultation 2/Phlebotomy
- 1234 - Ramp
- 1235A – Toilet/Changing Room
- 1235B – Private Gowning
- 1235C – Waiting Lobby
- 1235D - Janitorial Room
- 1235J - Electrical Room
Zone III
- 1235E - Equipment Room
- 1235G – Control Room
- 1235H - Vestibule
Zone IV
- 1235F – Scan Room
Pacemaker line (5 gauss)